Thursday, October 20, 2011

The End is Near!

Time to start Halloween. For a number of reasons, this will be our last Haunted House in Paradise. I am sad about ending our 16 + years of providing a safe and fun Halloween for the community. On the other hand, I am really looking forward to spending future Halloweens with my grandchildren in southern California!

For the last 10 years I have wanted to add the garden's side path to our Haunted House. Logistically it would have been a nightmare keeping track of all the people wandering through our front and back yard so we have never done the side path. But years ago my husband promised me I could do the side path for our last Halloween. The path is only 80 feet long, but it's narrow, with tree branches hanging over the path creating a perfect tunnel of foliage. Shrubs and perennials further enclose the path making this a very creepy place at night. I call this the "Tunnel of Terror." All of our other scenes have been balanced to provide just the right amount of entertainment for adults without scaring small children to tears. The Tunnel will be an in your face scare area - no small children allowed.

For starters I am making scarecrows out of Funkins I purchased at Michael's (70% off) after Halloween last year. If you've ever tried to carve a Funkin (foam pumpkin) you know what a pain in the ass they are. I purchased a small Stanley saw at OSH  and it does a pretty good job of carving the foam pumpkins. Since the pumpkins were white I had to paint the insides black and then spray paint the outside in a two step process. Each pumpkin will get a strand of orange mini lights. After painting all of the pumpkins I discovered the orange pumpkins didn't show up at night so I had to repaint all of them white! Nothing like doing the doing the work twice!

So anyway, here's the carving/saw knife I got at OSH.

Have I ever told you about spray construction foam? It's the best stuff ever invented (even better than duct tape.)  I used the foam to make pumpkin vines, hands and rib ages for scarecrows. Guts for the butcher's shop. Bubbling goop for the toxic waste barrels. And a camp fire for the witches cauldron. The vines were easy, I just sprayed 3 foot foam vines on a cloth. When dry, the foam peels right off of the fabric. 


Scarecrow hands were made from coat hangers that I cut to length and wrapped together. Using the foam I sprayed finger lengths of foam on paper and when it was almost dry I inserted the coat hanger wires into the foam. Once the foam was dry I peeled the paper off. Using scissors, I gave each finger a final shaping. 

To make the rib cage I drew it on cloth, then used the foam to "build" the bones. The cloth was draped over a roll of carpet to give the ribs some shape. Once the ribs were almost dry I spray painted the fabric between the bones with black paint. I painted the vines, hands and ribs with black, then white so they would show up good in the dark.  


I have been "haunting" thrift stores for the past year buying used black choir and graduation robes that I can use for my scarecrows. After a bunch of ripping, tearing and generally messing up the robes they will be ready for the scarecrows. Here's one of the finished scarecrows.


This is an upside down garbage can lid I filled with foam and bones, then spray painted. This goes in my Toxic Waste Room.

I also made a new guy for the Butcher Shop. I used an old piece of foam from the hot tub store to make a "body" and wrapped the foam in visquine. I then added a mask, painted the whole thing with blood and hung it upside down in the Butcher Shop. Unfortunately, the bloody paint on the mask has not dried (some kind of reaction to the soft plastic mask) so I have to figure out how to fix the wet stickiness.


We made a new character for the Deliverance scene. It's Ma and Pa's oldest son - Bubba. My friend Brenda helped me make Bubba, two new clowns and a witch this year. So much fun sharing the insanity with friends!

Our friend, Jerry Mendon with Mendon's Nursery, grew a lot of corn this year and he was kind enough to cut, bundle and save the stalks for me, so I have loads of corn for the "Tunnel of Terror."  This scare is really coming along. Last night we were doing a lighting check and I got the creeps just walking down the path. Imagine how much fun it will be with the volunteers jumping out!

I think it's a good thing this is our last year. My arthritis has been a big issue this year and the work has literally been a pain. We open tomorrow night and run for 10 straight days. We put a small notice in the Chico paper and the Paradise paper came by yesterday to take photos so I'm hoping for an extra good turnout this year (our last hurrah.)

Tuesday, August 2, 2011

Today we finished the bathroom! Window is framed, 1/4 round installed, chandelier is hung, baseboard finished and the shower door is installed. In two days we can use the shower (once the epoxy dries.)

Now I have to sew and upholster the pelmets above the bedroom windows. Then hang a ton of white sheers.


Trying to decide on a nightstand for Jim. I would love to add a piece of mirrored furniture to the bed room. Maybe I'll purchase an old side table or small chest of drawers from a thrift store and mirror it.

Here's some pictures of what they look like finished. Pretty cool. Just the right amount of bling!  They're a lot of work, first you have to cut the glass to size, sand the edges, etch the glass with acid, then glue the mirrors in place and trim the mirror for safety. We'll see. Sure is pretty.

 Got some bad news from Monster Guts yesterday... only tree months until Halloween! OMG, I am not ready for that. First of all, we are exhausted and not finished with the upstairs. Secondly, we have a lot of new stuff to do this year for The Tunnel of Terror and finally it's our last Halloween which is very depressing for me. 


Thursday, July 28, 2011

Almost Finished!

We finished installing the new flooring in the hallway, master bedroom and bathroom. It was a little harder to install than I expected. Really difficult to click and lock edges in tight spaces like under the vanity, in the closets and against the far wall. It probably didn't help that I have inflammatory arthritis in my hands. A friend loaned us the tools he uses to install Pergo and they really helped. We are really happy with how the floor looks. 


Jim cut all the new baseboard today and tomorrow we will get it nailed in place. A little paint touch up and the floor will be finished!

Our glass shower enclosure will be installed tomorrow morning. Can't wait to see how it looks. Jim will then flush all the water pipes in the shower and install the three shower heads.

We are almost finished. Still have two window sills to do; the bathroom chandelier to hang; and the bedroom window cornices need to be upholstered. I ordered all new bedding and then couldn't find fabric for the cornices. Today I discovered the bedding manufacturer sells matching fabric shower curtains so I ordered one (72" X 72") for the valances. Only cost $15, if I had found fabric it would have been around $100 or more.

This project has taken longer than I expected, but for a couple old geezers I guess that's OK.  Time for Tylenol and bed. 

Friday, July 22, 2011

Shower is now tiled and Jim has put up most of  the hardware. We have ordered the glass shower enclosure, it should be here next week. We ordered a frameless shower enclosure and it was not cheap ($1800.) To save a bunch of money we could have ordered one with a frame, but I wanted a clean and crisp look. Can't wait for the enclosure to be installed. One of the best remodel decisions we made was using the RediTile shower pan. It not only guarantees the shower will never leak, it made tiling the shower floor SO EASY! 


We hung the vanity mirrors and they look great!  So glad the vanity work is done. If you've never purchased framed mirrors before you are in for severe sticker shock. I wanted frames with an unusual shape and they are very expensive ($200 ad up!) Then I found these at Lowe's for $79 a piece. Unless you examine the backs you can't tell they're made of plastic! Everyone raves about how beautiful they are!!   


Finished tiling the bathtub. For the tub face I added three rows of pencil trim. They were a pain to install and the trim was very expensive ($7 a foot.) But it was just the touch I needed. A little detail, but nothing fancy. I used a TON of the tiny red tile wedges again, don't know how I would have done the tiling without them.


We are now laying the new floor. The upstairs is a master bedroom suite so I wanted the hallway, bedroom and bathroom flooring to flow throughout the space. The bathroom complicated my plan because it needed to be waterproof. The solution was Traffic Master Allure Ultra flooring. Looks like plank wood flooring, but is click and lock vinyl planks. It's 100% waterproof (hooray) and comes in many wood finishes. This flooring also comes in a ceramic tile look. It took us a while to figure out the layout (down the hallway, into the bedroom and then into the bathroom.) Getting the hang of the click and lock function also took some time, but once we had that figured out it laid down pretty quick. Jim would cut the pieces and I would install them. All you need is a case cutter to install the tile. Last year we bought a Roomba for the downstairs ceramic tile floors (where it does a great job.) Looking forward to using it upstairs now that the wall to wall carpet is gone. No more vacuuming the darn carpeted stairs and bedroom!!!!!!


Painting has been one of the hardest items on my list. With a 30" vaulted ceiling painting up high has not been fun. I am not keen on heights so standing at the tippy top of the tall ladder has made my tummy hurt and killed my back. There is a little touch up left on the bathroom ceiling and I have contacted a painter to do the 3 or 4 hours of painting left.
 
Soon I will be down to the pretty work, hanging pictures, new drapes and bedding, etc. Almost done!

Tuesday, July 5, 2011

Camping in Coos Bay, Oregon

Thinking of taking a vacation? Let me recommend Sunset Bay State Park just south of Coos Bay, Oregon to you. Our family has been vacationing there for many years. Since we live in northern California where summer temperatures soar to over 100 degrees we like to take a break from the hot weather and head north to the cooler Oregon coast. Sunset Bay Campground is a real gem! Surrounded by lush ferns and bog lilies each site is beautiful and private. Deciduous forest butts up to each site, providing the perfect habitat for birds. The air is filled with bird songs. It's a very short walk from your camp site to the bay where gulls
bathe at the mouth of a small fresh water creek that runs into the bay. The bay is perfect for playing in the sand, kayaking on calm waters, wading in the shallows, swimming in the cold water, checking out the tide pools and hiking.


Just offshore and tucked around the point is Cape Arago Lighthouse. In the mid-1800's, Coos Bay had become a center for the transport of lumber from Oregon's forests. To protect ships a 25 foot wooden tower housing a Fresnel lens was constructed.  Almost immediately, the elements took their toll on the lighthouse. Due to the demands of mariners for a better light, the original lighthouse was replaced in 1909.  Eventually erosion threatened the second lighthouse and in 1934 a third lighthouse was built.  This lighthouse remained in service until it was decommissioned in January, 2006.


Just south of the campground is Shore Acres State Park and Botanical Garden. This is one of my favorite gardens and I am constantly borrowing design and planting ideas from them. The gardens (seven acres) include a really lovely Japanese garden with a large pond. Rose enthusiasts will discover an All American Rose Test Garden.


Further down the road is Simpson Reef and Shell Island. The offshore rocks, islands and reefs provide breeding and resting areas for sea birds and marine mammals. You may see Gray Whales, Harbor Seals, Northern Elephant Seals, Stellar Sea Lions, California Sea Lions, Black Oyster Catchers and Pelagic Cormorants here. On the day this photo was take there were Sea Lions, Harbor Seals and Elephant Seals basking in the sun.


At the end of the road is Cape Arago, my personal favorite. The views are gorgeous! 


Vacationing on the coast also means great seafood. If you don't mind a little mud you can go clamming at low tide; or rent crab pots to catch Dungeness crab; or  you can buy shrimp straight off the boat in Charleston Harbor. YUM!


Our favorite thing to do at Sunset Bay Campground is PARTY! This year our party theme was Fiesta! There were serapes for the kids (and dogs) sombreros and Mexican leis for the everyone. We served pink lemonade in Margarita glasses (Ole) and had awesome Mexican food. We played pin the tail on the burro and a ring toss game with a blow up cactus. We even had a pinata! Some of the more daring members of our group did a conga line around the campsite. Everyone agreed it was our best party EVER.


Time to go back to work on the bathroom - Adios!

Sunday, June 19, 2011

Girlie Fingers

Have I told you about about my fingers? For years I have used hand cream to keep my hands soft. I always thought that was a good idea until now. Turns out manicures and soft hands do not fair well when tiling. You won't believe what happens to them during the tiling. Minute pieces of sharp sand scratch tiny nicks in my finger tips. Because these nicks are tiny you can't feel them right away. Only when the thinset (cement) gets embedded in these little nicks do you begin to notice them. That is because there is lime in the thinset and it BURNS. And did I say embedded? I really meant packed into my flesh. I cannot rinse it out, soak it out or dig it out. It eats away at the tiny nick until it is a hole. Then the hole becomes infected. I was tiling the back splash and kept having to wipe off this red stuff and I am saying to myself "What is that?" and "where did that come from?" Took a few minutes to realize it was blood (must be more of that fatigue leads to stupidness.) And of course, because it's my finger tips (which are loaded with nerve endings) it hurts like hell! As the work has progressed the number of Band aids has multiplied. I walk around like Dr. Killdare with my hands in the air, fingertips throbbing and burning. My husband asked "why don't you wear gloves to protect your fingers?" All those teeny weeny tiny itsy bitsy tile spacers and wedges is why I don't wear gloves. I have a new appreciation for professional tilers. The good news is I am almost done tiling. It's a good thing - I am now down to one finger that is not sporting a Band aid. 


I have one piece of quarter round trim left to install today. The quarter round was a pain in the *** to install.  I must have used a million tile wedges trying to keep the trim from slipping and sliding around. Finally I had to use painters tape to hold them in place. It's shocking the amount of thinset you have to use to put on a piece of quarter round. This was the hardest thing I have had to do, the mosaic tile and field tile were a piece of cake compared to the quarter round.

Another lesson I have learned.... If you're new to tiling only mix small amounts of thinset and grout. I mixed 4 - 6 cups at a time and kept a wet rag over the bucket to keep the stuff from drying out. A thorough stir every now and then and the stuff will stay fresh for an hour or two. Smaller amounts also made the bucket easier to carry when climbing the ladder.

Tuesday, June 14, 2011

Miscalculations


I have been busy tiling the bathroom. So far I've made a number of mistakes - most due to my inability to measure correctly. I keep forgetting to add the 1/8" grout line when I am measuring tile for cutting to size. When the shower is 7 feet tall that's a lot of 1/8's to miss (total of 7/8".) So I've had to do some fudging  to work things out. Most people would not care, but I am a severe type A personality who likes things pretty close to perfect. My husband keeps saying I will be the only one who knows about the mistakes, other people won't notice. But I will know. So here's a photo of my fudging - not a pretty sight. The mosaic tile was 1/4" higher than the cement backer board so I had to do a little thinset buildup. Unfortunately, my fix was so soft the tile kept flopping over so had to devise something to hold them in place until the thinset hardened.


If you ever decide to do a DIY bathroom remodel here are some tips that I found to be invaluable. Buy Tile Wedges, they're tiny red, plastic wedges that can be used to shim tile for leveling, you can stack them together when the regular tile spacers are not quite the right width. They can be used to keep rows of mosaic tile aligned, etc. Here is a photo of the wedges - love these!


I also discovered new spacers that are amazing. They not only separate tiles from each other in 1/8" or 1/4" sizes, but they also align corners perfectly!  Since I have arthritis in my hands these spacers are much easier to grip and use then the tiny plastic x's contractors have been using for may years.


A good friend of ours loaned me something called a sanding stone. I used it to sand down the cement board joints that I had taped and thinset. Taping and thinset can leave an uneven surface, by soaking the stone and then rubbing it across the joint it really smooths and levels the joint. It was really handy in areas that I had to float because the walls were not quite square. Made work so much easier.


Probably the most important tool in my tiling arsenal is a level (s.) I use a small level to check each tile as I set it, then 30" level to check the row I am working on and a 48" level to check the final edge. The large level also comes in handy as a straight edge to check for high and low spots. I cannot stress enough how important it is to take your time and check level each step of the way.

Today I will finish tiling the shower and begin setting quarter round trim. Never used it before, hear it's tricky to install.

Wednesday, June 8, 2011

Why do they call it Wonderboard?

In our ongoing effort to commit suicide by construction we spent all day today putting up sheets of cement board around the tub and shower. Why they call this product Wonderboard I will never know. It's very, very heavy, really rough, hard to cut and hard to screw to the walls.  Maybe it's name derives from the phrase "I wonder why I am doing this project?"  We still have a small piece of cement board to do tomorrow and then I can  tape and mud the joints while Jim finishes screwing the cement board to the wall. If all goes well I plan to tile the tub deck and surround tomorrow.


Today while Jim was grinding screw heads I sat down to sip my McDonald's iced Sweet Tea and take a break. At some point I heard a sound I could not place and finally located Maggie quietly sipping my tea! Who knew Basenji's like iced sweet tea?  Reminded me of our trip to Alaska and the floaties in my water bottle story.

Speaking of grinding screws, I thought Jim was trimming the edge of the tub deck. When I sat on the tub deck it was warm. So I asked "why is it warm" and Jim says "he was grinding screw heads." So remember this..... if you sit on something and it's pretty darn warm and someone mentions grinding screw heads don't be stupid enough to check a screw with your fingers! One of the things I've learned about projects like this is  fatigue leads to stupidness (I know that's not a word, but I think it's an apt description.)

You would think this level of physical labor would lead to a deep and restful night's sleep (NOT.) Instead of warm milk and a good book at bed time I am downing large doses of Tylenol and Flexeril followed by an hour in the hot tub. Then I limp up to bed where Jim lays comatose, moaning and groaning in his sleep.

It's almost time for drugs, more later.

Sunday, June 5, 2011

Master Bath Remodel

I apologize for being MIA for many months. For a couple of retired folks we have been way to busy.   We've racked up 6,000+ miles since February visiting children and grandchildren.

We are home now and have begun remodeling our master bathroom (or as I have come to think of it "OMG, are we trying to kill ourselves?") We did have a small dressing room and an even smaller bathroom. We tore out the wall between the two rooms and made one big bathroom. Since Murphy's Law ALWAYS applies to Massie projects it won't surprise you to learn the wall turned out to be load bearing. The good news was our house is post and beam construction so we only needed to add a new beam. Unfortunately, the beams in our house were custom milled so we had to wait for the lumber mill to cut us a new beam! Once the old wall was removed we also discovered the original contractor must have gotten a really really really good deal on nails since he used at least a million nails to hold the wall in place!


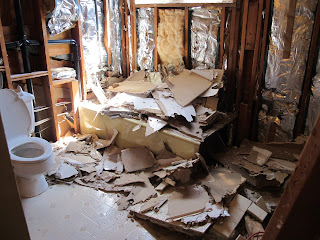
Once the wall was gone Jim cut the old vanity in half and removed it, took down the mirrors, demolished the linen closet (amazing how much junk we had crammed & jammed in there.) Jim and brother Bill sledge hammered the bathtub/shower tile surround into oblivion and unseated the toilet. Friends came over to help pry, chisel and scrape the old floor up and haul all the debris away.


Then came the fun part, getting the really heavy (300 pounds) cast iron bathtub out of the bathroom, down the stairs and out to the curb. Only took four men to drag the thing to the stairs, connect a rope and slide it down the stairs, tip it up on a dolly and wheel it out the front door. Kept expecting Henry to get crushed by the tub careening down the stairs! 


While all the hard work was going on I did my part by shopping for the new bathroom!  The Internet was a wonderful place to get great deals on everything.  My friends thought I was crazy for buying everything sight unseen but I did lots of research first and then price shopped. Saved a bunch by not having to pay California 7.25% sales tax. Plus all the orders shipped for free (hooray.)  Amazing how much stuff you need for a new bathroom. Bathtub and drain, shower pan, sinks and drains, lots of faucets and valves, towel bars, towel rings, robe hooks, TP dispenser, sconces, chandelier, vanity, linen closet, field tile, mosaic tile, chair rail tile pencil tile, tile, tile and more tile! 

It was so much fun getting all the stuff delivered, just like Christmas - only better. And everything was  perfect, no damage, no disappointments. Love the Internet! Here's my pile of bathroom booty.


Once the demolition was done Jim redid the electrical and our good friend Bob did the plumbing. Then the new tub deck and shower were framed in and the green board was hung, taped and the wall textured. I spent several days painting the bathroom. The ceiling is about 15 feet high so it was a real pain to paint.


The new vanity was delivered and it looks great! It took me a few days, but I finished tiling the vanity and back splash. My poor hands will never be the same. The thinset (a type of cement used to adhere tile) has course sand and lime in it and any little scratch gets embedded with the thinset. Since the lime is corrosive it eats away at the tiny scratches until they're painful sores. So remember, if you need to clean up a drip or wipe off a smudge of thinset. use a rag not your fingers! When I planned this bathroom I was so excited about getting wall mount faucets and vessel sinks. Unfortunately I did not consider the level of difficulty required to tile around the faucets! I had to cut the sheets of mosaic tile apart so I could tile one itty bitty piece at a time all around the stubbed out faucets. It was really frustrating and slow work, thank goodness it's done now.


Have I mentioned what's happened to my house?  It looks like the Pillsbury Doughboy went berserk showering the whole house with flour! Yes, that's right - it's construction dust. Our bedroom has become construction central, the new soaking tub is sitting at the foot of  our bed, Jim's power tools are stacked against one wall and all the faucet paraphernalia and shop vacuum are stacked against the other side of the bedroom. It's become a real challenge getting in and out of bed. Our dog Maggie is spending a lot of time upstairs with us and she finds it difficult to find a place to lay down and watch.  And speaking of upstairs, as part of the demo we had to disconnect the toilet, so it's just sitting in the middle of the bathroom right now. The midnight call of nature has become a real challenge as we try to weave our way through the mess to get downstairs.

Next is grouting. The back splash has glass, marble and travertine tile so I'll need to use unsanded grout so I don't scratch the glass. Once I finish this, it's on to the bathtub and shower. This work should go quicker since it's mostly 12 X 12 field tile.